Stacking Astrophotos with Hugin
Note: The instructions on this page have already become obsolete as a result of significant changes in the user interface of Hugin. I will keep this page online, though, in the hope that some of the information may still be useful.
Introduction
This page explains how to stack astrophotos with the panorama stitching software Hugin. This is useful whenever several exposures of the the same region of the sky need to be stacked in an attempt to create a single image with high signal-to-noise ratio and high dynamic range. In principal, Hugin can also correct, shift, and rotate the individual exposures. This allows the alignment and stacking of images that were taken without a tracking mount.
Step 1: Loading Images into Hugin
Once Hugin has started, navigate to the tab labelled “Assistant” and click on the “Load images...” button to load all your images into the software. Alternatively, you can go to the “Images” tab and click the “Add individual images...” button. Ensure that only images showing the same part of the sky are loaded.
Step 2: Setting Control Points
In order for Hugin to know how to correct and shift the individual images, the software needs to identify individual structures that are visible in all images. When stitching a terrestrial panorama, Hugin can automatically find such structures, called “control points”. When dealing with astrophotos, however, the automatic control point algorithm will usually fail, because there are too many stars in the image that all look the same and will confuse the algorithm. Therefore, control points will have to be set manually in every single image. This is the most time-consuming part of the entire process and can take more than an hour if a larger number of images (> 20) needs to be stacked.
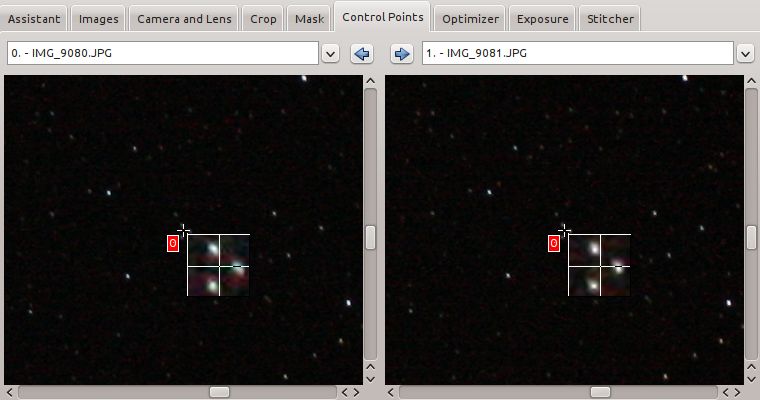
To begin the process, navigate to the “Control Points” tab. Then select the first image from the drop-down list on the left-hand side and the second image from the list on the right-hand side. In order to identify control points common to both images you will need to identify suitable and conspicuous structures that the algorithm can easily identify in both images. Useful structures typically include isolated, bright stars, close pairs or triplets of equally bright stars, compact star clusters, bright gas nebulae, etc. In other words, any object with bright, compact, and unique structures will usually be suitable.
Choose your first structure, preferably one near the centre of the image (or the overlap region between the two images), and click on it in the left-hand image. Hugin will then zoom in on that region and allow you to adjust the position of the box marking the control point, if necessary. Then click on the same structure in the right-hand image. Hugin should now automatically identify and mark the same control point in the right-hand image as well. If not, simply use the “undo” function in the menu and try again. Once the control point has been correctly identified by Hugin, proceed in the same manner by selecting another suitable control point. Make sure that you select at least ten control points, covering as much of the image as possible. It is important to include some control points near the edge of the image, where lens distortions are usually largest. Once satisfied, proceed to the next pair of images by clicking on the arrow button (“next image pair”) in between the two drop-down lists.
In principle, it would be desirable to define control points for any possible pair of images, but this would take far too long, as for N images a total of N × (N − 1) / 2 pairs of images exist and would need to be processed. In the case of 15 images, for example, this would result in 105 pairs, which would take many hours to process by hand. Therefore, I usually only process consecutive pairs of images, i. e. pair 1–2, pair 2–3, etc., which appears to result in good stacks and for N images will only require N − 1 pairs to be processed.
Unfortunately, the user interface for setting control points in Hugin is rather quirky, and it takes a while to get used to it and understand how to correctly set, modify, or delete control points.
Step 3: Correcting for Distortion, Shift, and Rotation
In order to correctly align all images, the distortion, shift, and rotation of each image will need to be calculated from the control points. To achieve this, navigate to the “Optimizer” tab, select “Everything without translation” from the drop-down list, and then start the optimisation process by clicking on the “Optimize now!” button. Once completed, a preview of your final image should appear in the “Fast Panorama preview” window.
Step 4: Stacking the Images
The final step is to stack the images and write the final, stacked image to disc in an HDR image format. To achieve this, navigate to the “Stitcher” tab and select your preferred projection from the drop-down list at the top. In most cases, “Equirectangular” or “Cylindrical” will do the job. Next, click the “Calculate Field of View”, “Calculate Optimal Size”, and “Fit Crop to Images” buttons in consecutive order. This will calculate the optimal image geometry and should result in a neatly oriented and cropped image in the “Fast Panorama preview” window.
Lastly, deselect all check boxes in the “Panorama Outputs” section (as we don’t want a stitched panorama) and instead select the “High dynamic range merged stacks” option in the “Combined stacks” section. Then click on the “Stitch!” button to run the stacking and write the output to disc. The output image will be written in OpenEXR format, and you will need an image processing software that can read OpenEXR images; GIMP doesn’t, but Krita, although buggy and unstable, is able to read the EXR format. Another option is to use exrtools to display and manipulate the output image and then convert it into the more widely supported PNG format.
Epilogue
Unfortunately, there are a few errors and bugs in some of the software components used by Hugin for processing and stacking images. Sometimes the process fails entirely or the output file cannot be read. A lot of patience is often needed to get a usable output from Hugin. However, when it does work, it appears to be doing a very good job in stacking astrophotos, and Hugin is particularly useful for accurately aligning and stacking images taken without tracking. The official Hugin website has more information about the software, including online tutorials available in different languages.