Creating Star Trail Images
Introduction
In the era of chemical photography star trail images were created by simply setting up a camera and then exposing for several hours, resulting in the stars in the image to be stretched into long arcs due to the Earth’s rotation. Since then, things have become a lot easier with the introduction of digital photography, and much more advanced star trail images can now be created from hundreds of individual, short exposures. This page does not deal with any of the general aspects of taking star trail images, but rather explains some of the technical details of how to turn a set of individual digital photos into a combined star trail image. I also provide a simple Python script that can be used for this purpose.
Summation vs. Brightening
One of the great advantages of stacking digital photos is that we can be smarter than simply adding up all the individual images (which is what the old-style chemical star trail photography effectively did). When adding more and more photos, the stars in the image will appear fainter and fainter (relative to the landscape and the sky background) because their light will be stretched into longer and longer arcs and hence be spread out across a large area. A much more effective way of stacking the individual images is to brighten rather than add them. That is, rather than calculating the sum of all images for every pixel (x,y),
Btotal(x,y) = ∑ Bn(x,y),
we instead pick the image that is brightest at pixel (x,y),
Btotal(x,y) = max{Bn(x,y)},
and use only its value in the stacked image. This method ensures that the stars remain as bright as in each individual image because no summation takes place. A comparison between the summation and brightening methods is shown in Fig. 1 below for a star trail image of the south celestial pole.
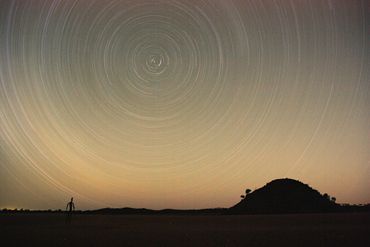
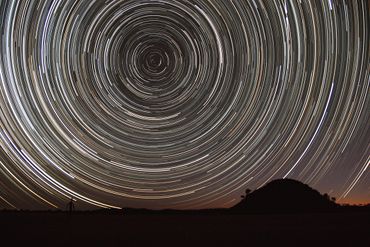
The difference between the two images is astounding, given that both were generated from the same set of individual exposures. In the summed image the star trails are barely visible against the bright sky background after more than 3 hours of total integration time, while in the image created using the brightening method the star trails appear very bright and prominent against the dark sky.
Also note that the brightening method preserves the brightness of each star, i.e. the brightest stars create the brightest trails, whereas in the summed image stars closest to the south celestial pole — although in reality rather faint — create the brightest trails because their light is not smeared out as much as that of stars further away from the pole.
Stacking Software
There is a plethora of commercial and freely available software for creating star trail images from a set of individual images. Among those are Startrails and StarStaX, both of which are freely available. However, most of these software packages are somewhat over-engineered, and many of them are only available for specific operating systems.
MiniTrail
After several unsuccessful attempts to install and run some of the existing stacking software, I finally ended up writing my own star trail stacking script, MiniTrail, in just a few lines of Python code. The images shown above in Fig. 1 were actually created with MiniTrail. The source code is shown below:
import os, numpy
from PIL import Image

files   = os.listdir(os.getcwd())
images  = [name for name in files if name[-4:] in [".jpg", ".JPG"]]
width, height = Image.open(images[0]).size

stack   = numpy.zeros((height, width, 3), numpy.float64)
counter = 1

for image in images:
    print("Processing image " + str(counter))
    image_new = numpy.array(Image.open(image), dtype = numpy.float64)
    stack     = numpy.maximum(stack, image_new)
    counter  += 1

stack = numpy.array(numpy.round(stack), dtype = numpy.uint8)

output = Image.fromarray(stack, mode = "RGB")
output.save("MiniTrail_stacked_image.jpg", "JPEG")
If you would like to use MiniTrail to create your own star trail images, ensure that you have Python (with NumPy and the Python Imaging Library) installed on your computer. Copy and paste the source code above into your favourite text editor and save it as MiniTrail.py in the directory where your raw images are located. Then open a terminal window, change into the respective directory, and type
python MiniTrail.py
to run the script (assuming you are using Linux or Unix; I have no idea how to run Python scripts on a Windows machine). MiniTrail will automatically load and stack all image files in that directory with file names ending in either .jpg or .JPG. Depending on the number and size of the images, this can take a few minutes. The stacked star trail image will be saved as
MiniTrail_stacked_image.jpg
in the same directory. If you run MiniTrail repeatedly, ensure that the output image from the previous run is either deleted or moved to a different directory, as otherwise it would get added into the next stack! Note that MiniTrail implicitly assumes that all input images have the same size, and its behaviour will be undefined if that’s not the case. Lastly, MiniTrail comes without any warranty, and use of the code and any information on this page is at your own risk. It is generally advisable to back up all data before processing any images.